Overview

Quickstart

This guide provides an introduction to getting started with our APIs.

Starter mode

Pier’s Starter Mode allows you to use Pier for ledgering and compliance without Pier’s funds flow. Please see Starter Mode for more information.

Environments

The Pier API is accessible in two environments:

EnvironmentAPI url
Sandboxsandbox.pier-finance.com/api
Productionproduction.pier-finance.com/api

The sandbox is designed to mimic the production environment, with a few exceptions. Loan agreements created in the sandbox will have large ‘draft’ watermarks and funds flows will only occur in production. Sandbox API keys are prefixed with test_ while production API keys are prefixed with prod_. Otherwise, sandbox and production behavior is identical.

Postman Collection

You can fork our Postman Collection to immediately start interacting with the API. You’ll need to set a few variables to get started:

VariableDescription
clientIdYour API client ID (add this to the collection level Variables)
secretYour API secret (add this to the collection level Variables)
tokenThe JWT token you get back from the /token endpoint (this goes in the Authorization header of each request; the Pre-request Script will set/update it for you)
baseUrlThis should generally be set to https://sandbox.pier-finance.com/api

When you open the collection click on the top level titled Pier Api and choose Variables. Create the variables clientId/secret and set the Current value field (prevents credentials leaking). You are good to go! The Pre-request Script will now automatically fill out the token variable for each request:

1pm.sendRequest({
2 url: pm.collectionVariables.get('baseUrl') + '/token',
3 method: 'POST',
4 header: {
5 'Content-Type': 'application/json'
6 },
7 body: {
8 mode: 'raw',
9 raw: JSON.stringify({client_id: pm.collectionVariables.get('clientId'), secret: pm.collectionVariables.get('secret')})
10 }
11}, function (err, res) {
12 pm.collectionVariables.set('token', res.json().token);
13});

This is a convenience that sets the token automatically each request and is simply calling the /token endpoint like you would in your application.

OpenAPI Client Generation

Generation

Please see our OpenAPI Spec Repo to access our openapi.yml spec file and generate a client in your language of choice. The following is an example on how to generate the typescript-axios SDK using openapi-generator on Mac:

$brew install openapi-generator
>openapi-generator generate \
> -i openapi.yml \
> -g typescript-axios \
> -o ./pier-typescript \
> --additional-properties=supportsES6=true

Utilization

Here is an example of how to use the generated typescript-axios SDK:

1import axios from "axios";
2import {
3 Configuration,
4 AuthApi,
5 BorrowersApi
6 // Any other apis you will use
7} from "./pier-typescript";
8
9const PIER_API_BASE_PATH = "https://sandbox.pier-finance.com/api";
10
11const configuration = new Configuration({
12 basePath: PIER_API_BASE_PATH
13});
14
15const api = axios.create({baseURL: PIER_API_BASE_PATH});
16
17const authApi = new AuthApi(configuration);
18
19/* This section is useful to handle refreshing the token */
20let accessToken: string;
21api.interceptors.request.use(
22 async (config) => {
23 if (!accessToken) {
24 await getAccessToken();
25 }
26 config.headers.Authorization = accessToken;
27 return config;
28 },
29 (error) => Promise.reject(error)
30);
31api.interceptors.response.use(
32 (response) => response,
33 async (error) => {
34 const originalRequest = error.config;
35 if (error.response.status === 401 && !originalRequest._retry) {
36 originalRequest._retry = true;
37 await getAccessToken();
38 return api(originalRequest);
39 }
40 return Promise.reject(error);
41 }
42);
43const getAccessToken = async () => {
44 try {
45 const {data: {token}} = await authApi.authGetToken({
46 client_id: "<CLIENT_ID>",
47 secret: "<SECRET>"
48 });
49 accessToken = `Bearer ${token}`;
50 } catch (error) {
51 console.error("Error getting access token: ", error );
52 }
53}
54
55(async () => {
56 const borrowersApi = new BorrowersApi(
57 new Configuration({}),
58 PIER_API_BASE_PATH,
59 // Pass the custom axios instance to all apis
60 // except AuthApi to handle bearer token refresh
61 api
62 );
63
64 const {data: borrowers} = await borrowersApi.borrowersListAllBorrowers({});
65
66 console.log("List of borrowers: ", borrowers);
67})();

Authentication

Pier uses bearer auth to authenticate API requests. Call the /token endpoint using client_id and secret in the post body to get a JWT token. The token should be included in the Authorization header of all subsequent requests in the format of Bearer ${token}.

Rate limits and retrying API requests

Only 5xx (Server Errors) and 429 (Rate Limits) errors should be retried.

Pier’s rate limit is set to 1,000 requests per minute. The limit applies to both the sandbox and production environments. If a rate limit is triggered, we will respond with a 429 status code.

Timezones

All loan-related items are in Pacific Time (PT). This includes things like first_payment_date, next_payment_date, all of the loan amortization schedules, etc. These times are usually date format (e.g. YYYY-MM-DD) and simply determine the payment/accrual dates. All other (not payment related) timestamps are UTC and will follow the ISO8601 format.

Contributing

Feel free to contribute a pull request to our docs repo if you find anything that can be approved. We appreciate your help making our docs better!

Platform Status

See Pier’s Status Page for platform availability and feel free to subscribe for updates.

High-level origination flow

The following diagram outlines how the Pier origination flow works with the Borrower, Application, Loan Agreement and Facility resources:
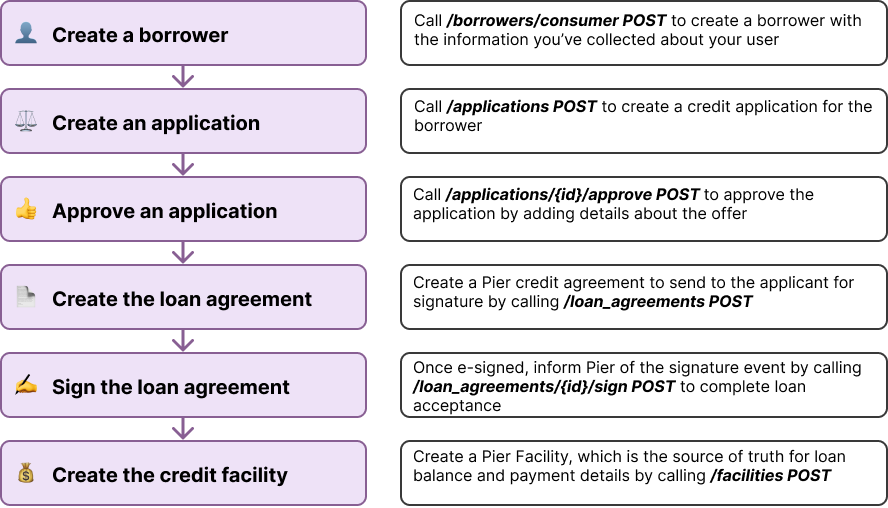
quickstart diagram

Step 1: Create Borrower

$curl -X POST https://sandbox.pier-finance.com/api/borrowers/consumer \
>-H 'Content-Type: application/json' \
>-H 'Authorization: Bearer ${PIER_ISSUED_JWT}' \
>-d '{
> "address": {
> "line_1": "15 Main Street",
> "line_2": "Unit 220",
> "city": "Seattle",
> "state": "WA",
> "zip": "98101"
> },
> "date_of_birth": "1991-06-19",
> "email": "pmartin@email.com",
> "first_name": "Pierre",
> "last_name": "Martin",
> "ssn": "111111111",
> "kyc_completion_date": "2023-03-27"
>}'

Step 2: Create application

$curl -X POST https://sandbox.pier-finance.com/api/applications \
>-H 'Content-Type: application/json' \
>-H 'Authorization: Bearer ${PIER_ISSUED_JWT}' \
>-d '{
> "borrower_id": "bor_7b1b1f0d97554532a2681e4159ec2a8a",
> "credit_type": "consumer_installment_loan"
>}'

Step 3: Approve application

$curl -X POST https://sandbox.pier-finance.com/api/applications/app_ae982db618544da9ac6fad552cede6f0/approve \
>-H 'Content-Type: application/json' \
>-H 'Authorization: Bearer ${PIER_ISSUED_JWT}' \
>-d '{
> "offers":[{
> "amount": 2000000,
> "interest_rate": 1300,
> "payment_period": "monthly",
> "origination_fee": 0,
> "late_payment_fee": 0,
> "type": "loan_offer",
> "loan_term": {
> "term_type": "months",
> "term": 12
> }
> }]
>}'

Step 4: Create loan agreement

$curl -X POST https://sandbox.pier-finance.com/api/loan_agreements \
>-H 'Content-Type: application/json' \
>-H 'Authorization: Bearer ${PIER_ISSUED_JWT}' \
>-d '{
> "application_id": "app_ae982db618544da9ac6fad552cede6f0",
> "accepted_offer_id": "off_b71c4524ac57467e982ce5414800c27f"
>}'

Step 5: Sign loan agreement

$curl -X POST https://sandbox.pier-finance.com/api/loan_agreements/doc_6f9c7af667024d5f837ae5a0fb942a8a/sign \
>-H 'Content-Type: application/json' \
>-H 'Authorization: Bearer ${PIER_ISSUED_JWT}' \
>-d '{}'

Step 6. Create credit facility

$curl -X POST https://sandbox.pier-finance.com/api/facilities \
>-H 'Content-Type: application/json' \
>-H 'Authorization: Bearer ${PIER_ISSUED_JWT}' \
>-d '{
> "loan_agreement_id": "doc_6f9c7af667024d5f837ae5a0fb942a8a"
>}'